15多级缓存
1.什么是多级缓存
我们之前已经使用redis建立了一个缓存,但是不只有redis可以实现缓存效果,nginx、jvm等均能实现缓存消息,如果我们把这些部分都建立了缓存,就能在请求时先检测第一层缓存有没有想要的内容,如果有,就返回,如果没有,就接着向下一层请求,如果下一层的缓存中有数据,就返回,如果没有,接着向下一层请求。如下图所示:
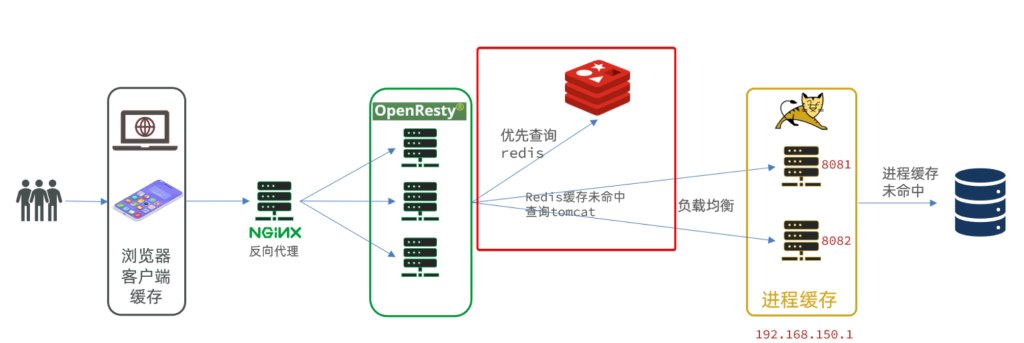
这个图就是一个形象的例子,但是与我们真实项目有所差异。下面是这个例子的逻辑:
- 浏览器访问静态资源时,优先读取浏览器本地缓存
- 访问非静态资源(ajax查询数据)时,访问服务端
- 请求到达Nginx后,优先读取Nginx本地缓存
- 如果Nginx本地缓存未命中,则去直接查询Redis(不经过Tomcat)
- 如果Redis查询未命中,则查询Tomcat
- 请求进入Tomcat后,优先查询JVM进程缓存
- 如果JVM进程缓存未命中,则查询数据库
我们的项目很简单,前端不动,发送请求后先查询nginx的缓存,nginx缓存没有需要的数据就请求tomcat服务器,查询JVM缓存,如果JVM缓存没有需要的数据,就查询redis缓存,如果redis没有需要的数据,最后去mysql查询。
可能有的人会有疑问:
1.建立这么多级缓存,如果有个数据我在各级缓存都没用,我就得在每一级缓存都找一遍,最后再去数据库,这样不会很浪费时间吗?而且我们读写缓存也需要时间,建立这么多缓存,读写这么多缓存,会不会导致最终性能还不如直接读取数据库的内容?
2.为什么是按照这个缓存顺序呢?我能不能更换一下查询缓存的顺序,我先查找redis,然后nginx,最后JVM?
1.1建立缓存真的可以提高效率吗?
为了解答这两个问题,我们先介绍一下nginx缓存、JVM缓存、redis缓存、MySQL数据库的性能:
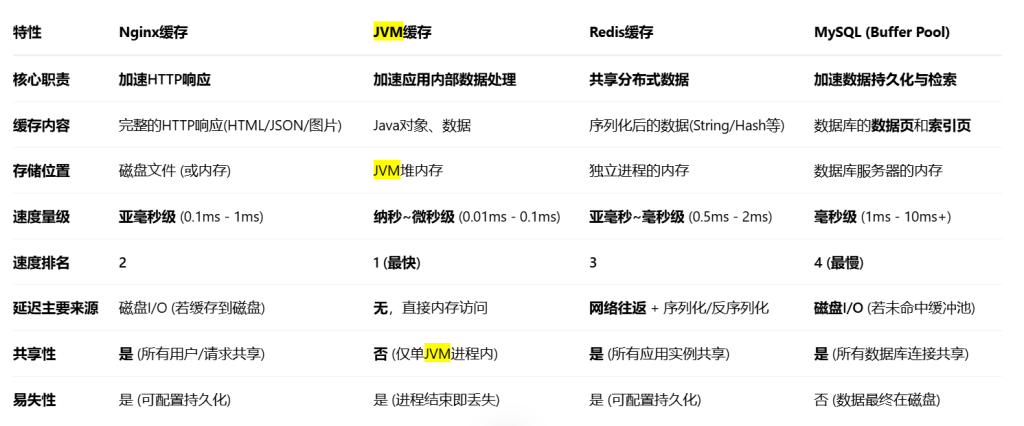
如图所示,Nginx缓存、JVM缓存由于是在本地查询缓存,速度极快,Redis缓存需要网络请求,但是速度也比MySQL快一个数量级。
最差的情况就是我们所有的缓存都没有需要数据,所有缓存都读取了一遍,然后读取完数据库还需要把所有缓存都更新一遍,最后返回给前端数据。但是由于缓存读写速度极快,所以相对于直接读取数据库,性能几乎不会降低。但是只要不是这种最坏的情况,这个请求都可以省掉读取数据库的时间,这个省掉的时间很多。所以建立多级缓存一定能提高性能。
1.2多级缓存的顺序
由于请求是 前端->nginx->后端->数据库,所以建立的多级缓存应该是:
nginx缓存->JVM、redis缓存->数据库
但是是要先查询JVM缓存还是先查询redis缓存?JVM缓存空间小,但是更快;redis缓存空间大,但是更慢。我们应该先查询更快的缓存,再查询更慢的缓存,所以应该先查询JVM缓存,再查询redis缓存:
nginx缓存->JVM缓存->redis缓存->数据库
2.项目添加JVM缓存
我们实现JVM缓存使用的是Caffeine框架
Caffeine是一个基于Java8开发的,提供了近乎最佳命中率的高性能的本地缓存库。目前Spring内部的缓存使用的就是Caffeine。GitHub地址:https://github.com/ben-manes/caffeine
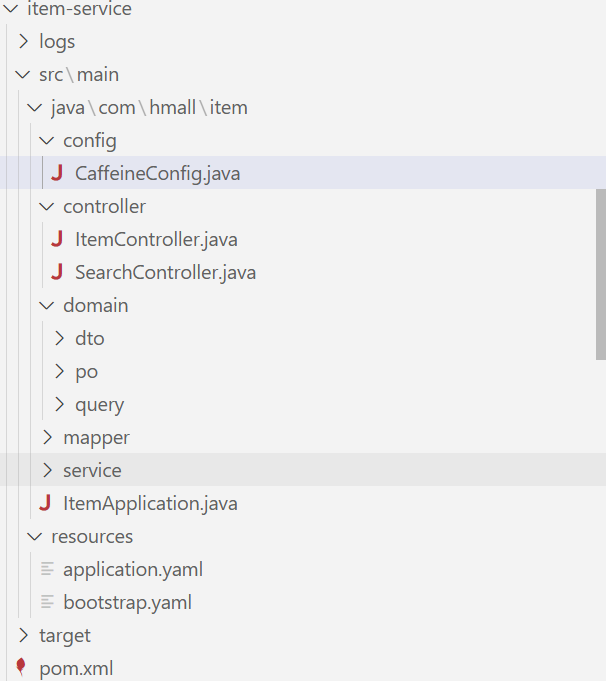
以item-service为例:首先添加依赖
        <!--Caffeine缓存-->
        <dependency>
            <groupId>com.github.ben-manes.caffeine</groupId>
            <artifactId>caffeine</artifactId>
        </dependency>
然后创建Caffeine缓存配置类
package com.hmall.item.config;

import com.github.benmanes.caffeine.cache.Cache;
import com.github.benmanes.caffeine.cache.Caffeine;
import com.hmall.item.domain.dto.ItemDTO;
import org.springframework.context.annotation.Bean;
import org.springframework.context.annotation.Configuration;

import java.util.concurrent.TimeUnit;

/**
 * Caffeine缓存配置类
 * 提供JVM级别的本地缓存,作为Redis缓存的前置缓存
 *
 * @author 虎哥
 * @since 2023-05-05
 */
@Configuration
public class CaffeineConfig {

  /**
   * 商品信息缓存
   * 缓存ItemDTO对象,用于快速查询商品信息
   */
  @Bean
  public Cache<Long, ItemDTO> itemCache() {
    return Caffeine.newBuilder()
        // 初始容量
        .initialCapacity(100)
        // 最大容量
        .maximumSize(10_000)
        // 写入后过期时间
        .expireAfterWrite(30, TimeUnit.MINUTES)
        // 访问后过期时间
        .expireAfterAccess(10, TimeUnit.MINUTES)
        // 启用统计
        .recordStats()
        .build();
  }
}
改造item-service中controller中的接口,原来只使用了redis缓存的接口现在添加JVM缓存
@ApiOperation("根据id批量查询商品")
    @GetMapping
    public List<ItemDTO> queryItemByIds(@RequestParam("ids") List<Long> ids) {
        List<ItemDTO> result = new java.util.ArrayList<>();
        List<Long> jvmMissIds = new java.util.ArrayList<>();

        // 1. 先批量查JVM缓存
        for (Long id : ids) {
            ItemDTO itemDTO = itemCache.getIfPresent(id);
            if (itemDTO != null) {
                result.add(itemDTO);
            } else {
                jvmMissIds.add(id);
            }
        }

        // 2. 对JVM缓存未命中的,查Redis
        List<Long> redisMissIds = new java.util.ArrayList<>();
        if (!jvmMissIds.isEmpty()) {
            List<Object> cachedList = redisTemplate.opsForValue().multiGet(
                    jvmMissIds.stream().map(id -> "item:" + id).collect(java.util.stream.Collectors.toList()));
            if (cachedList != null) {
                for (int i = 0; i < jvmMissIds.size(); i++) {
                    Object obj = cachedList.get(i);
                    if (obj != null) {
                        ItemDTO itemDTO = (ItemDTO) obj;
                        result.add(itemDTO);
                        // 回写到JVM缓存
                        itemCache.put(jvmMissIds.get(i), itemDTO);
                    } else {
                        redisMissIds.add(jvmMissIds.get(i));
                    }
                }
            } else {
                // 如果Redis返回null,说明所有商品都需要查数据库
                redisMissIds.addAll(jvmMissIds);
            }
        }

        // 3. 对Redis缓存未命中的,查数据库并回写缓存
        if (!redisMissIds.isEmpty()) {
            List<ItemDTO> dbList = itemService.queryItemByIds(redisMissIds);
            for (ItemDTO item : dbList) {
                // 回写到JVM缓存
                itemCache.put(item.getId(), item);
                // 回写到Redis
                String redisKey = "item:" + item.getId();
                redisTemplate.opsForValue().set(redisKey, item, 1, java.util.concurrent.TimeUnit.HOURS);
                result.add(item);
            }
        }
        return result;
    }

    @ApiOperation("根据id查询商品")
    @GetMapping("{id}")
    public ItemDTO queryItemById(@PathVariable("id") Long id) {
        String redisKey = "item:" + id;

        // 1. 先查JVM缓存(Caffeine)
        ItemDTO itemDTO = itemCache.getIfPresent(id);
        if (itemDTO != null) {
            System.out.println("从JVM缓存中获取的商品: " + itemDTO);
            return itemDTO;
        }

        // 2. 再查 Redis
        itemDTO = (ItemDTO) redisTemplate.opsForValue().get(redisKey);
        if (itemDTO != null) {
            System.out.println("从Redis中获取的商品: " + itemDTO);
            // 回写到JVM缓存
            itemCache.put(id, itemDTO);
            return itemDTO;
        }

        // 3. 查数据库
        itemDTO = BeanUtils.copyBean(itemService.getById(id), ItemDTO.class);
        if (itemDTO != null) {
            // 4. 写入JVM缓存
            itemCache.put(id, itemDTO);
            // 5. 写入Redis,设置过期时间(如1小时)
            redisTemplate.opsForValue().set(redisKey, itemDTO, 1, java.util.concurrent.TimeUnit.HOURS);
        }
        return itemDTO;
    }
这里需要注意一下,JVM缓存是本地缓存,所以当我在同一个nacos中开启多个相同的服务,这些服务的JVM缓存是不共享的。如果想要解决这个问题,建议使用nginx来查询JVM的缓存,而不是将项目注册到nacos。以item-service为例,nacos中有多个item-service时,nacos决定使用哪个item-service是随机的,但是nginx配置hash随机,使得相同的url请求只能发送到同一个item-service。
具体实现可以看这个视频:高级篇-多级缓存-14-多级缓存-根据商品id对tomcat集群负载均衡_哔哩哔哩_bilibili
3.项目添加nginx缓存
3.1nginx自带的缓存
nginx自带的缓存其实不好用,但是这里还是讲一下:
打开nginx的conf文件夹下的nginx.conf文件添加如下配置:
下图这个是告诉系统,你的缓存放到哪里,以及缓存的一些约束
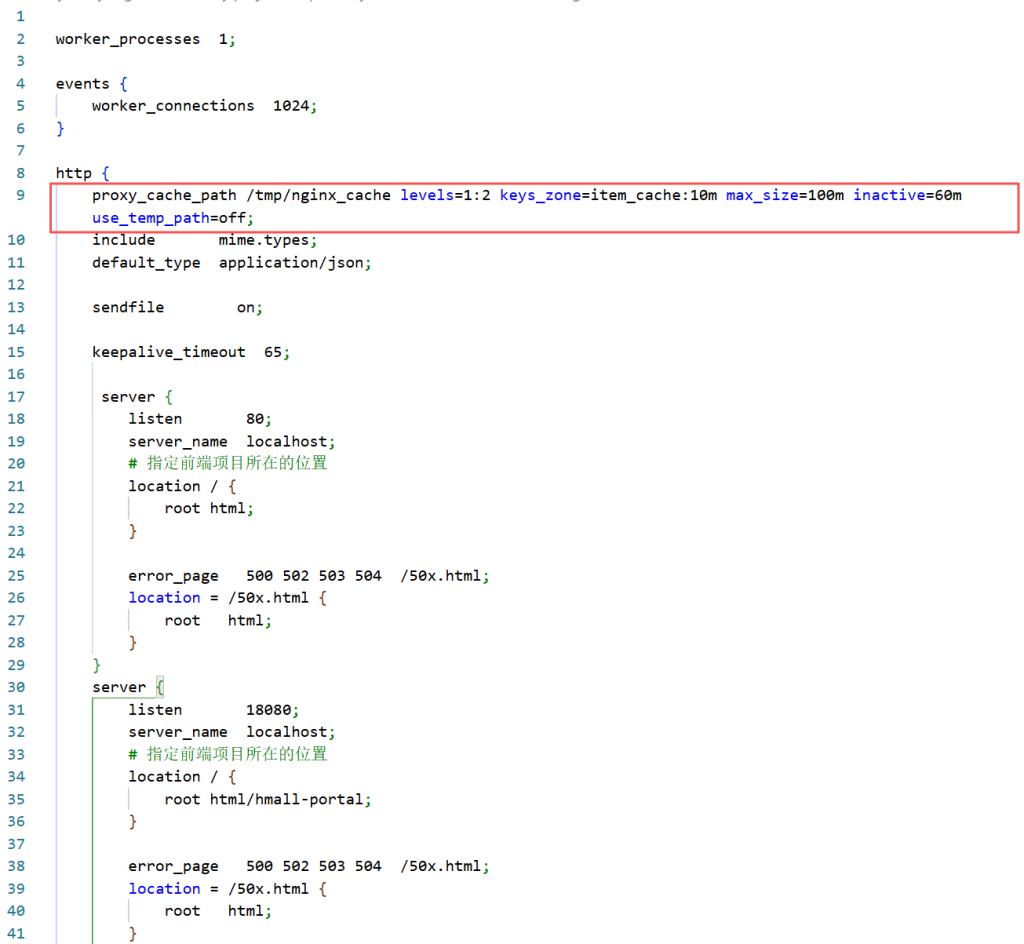
proxy_cache_path /tmp/nginx_cache levels=1:2 keys_zone=item_cache:10m max_size=100m inactive=60m use_temp_path=off;然后在监听18080的server中添加针对/api/item/{id}、/api/items?ids=1,2,3这两类请求(其实就是上面添加JVM的那两个接口)添加针对性的内容:
server {
        listen       18080;
        server_name  localhost;
        # 指定前端项目所在的位置
        location / {
            root html/hmall-portal;
        }

        error_page   500 502 503 504  /50x.html;
        location = /50x.html {
            root   html;
        }
        # 缓存单个商品详情
        location ~ ^/api/items/\d+$ {
            proxy_cache item_cache;
            proxy_cache_valid 200 1h;
            add_header X-Cache-Status $upstream_cache_status;
            rewrite /api/(.*) /$1 break;
            proxy_pass http://localhost:8080;
        }

        # 缓存批量查询(可根据实际参数格式调整)
        location ~ ^/api/items(\?.*ids=.*)$ {
            proxy_cache item_cache;
            proxy_cache_valid 200 10m;
            add_header X-Cache-Status $upstream_cache_status;
            rewrite /api/(.*) /$1 break;
            proxy_pass http://localhost:8080;
        }
        location /api {
            rewrite /api/(.*)  /$1 break;
            proxy_pass http://localhost:8080;
        }
    }
这样缓存就建立好了,但是这个缓存的查找逻辑是:存储请求的url和返回内容,如果下次查询时请求的url和缓存中一样,就直接返回缓存中的内容。但是nginx原始的缓存很笨重。
以我们上面的两个接口为例,两个接口分别是根据id查询商品信息,根据ids数组查询商品信息。
缓存中的有用信息没有利用上,比如我们之前发送了查询id为1的商品的请求,发送了查询ids=2,3,4的商品的请求。理论上我们的缓存中就有了id为1,2,3,4这四个商品的信息,但是下次查询ids=1,2,3,4的商品的请求,由于我们缓存中没有url为/api/item/ids=1,2,3,4这个url对应的返回内容,所以本次查询就会发送到后端,而不会利用缓存中的有效信息。
为了能更加灵活地存储缓存、查询缓存,我们需要使用新的工具OpenResty
3.2使用OpenResty实现nginx缓存
1.OpenResty介绍
OpenResty® 是一个基于 Nginx的高性能 Web 平台,用于方便地搭建能够处理超高并发、扩展性极高的动态 Web 应用、Web 服务和动态网关。具备下列特点:
- 具备Nginx的完整功能
- 基于Lua语言进行扩展,集成了大量精良的 Lua 库、第三方模块
- 允许使用Lua自定义业务逻辑、自定义库
官方网站: https://openresty.org/cn/

2.OpenResty下载与搭建
OpenResty – 下载 下载其中windows64版本的,然后解压缩,得到openresty-1.27.1.2-win64文件夹
然后将原来hmall-nginx文件夹中的html文件替换掉openresty-1.27.1.2-win64文件夹中的html文件夹
最后将hmall-nginx/conf目录下的nginx.conf复制并替换掉openresty-1.27.1.2-win64/conf目录下的nginx.conf文件
这样就完成了,但是需要注意,以后我们就不使用hmall-nginx这个项目了,只使用openresty-1.27.1.2-win64项目。所以需要关掉hmall-nginx的nginx,然后启动openresty-1.27.1.2-win64的nginx。
3.Lua编程语言与OpenResty的学习
OpenResty之所以能灵活创建缓存、读取缓存,是因为其允许用户使用一遍编程语言来写创建缓存、读取缓存的逻辑,这门编程语言是Lua。
Lua十分简单,这也是选择使用它来编写缓存脚本的原因。
【无废话30分钟】Lua快速入门教程 – 4K超清_哔哩哔哩_bilibili
这里有个系统讲解OpenResty的课程,读者可以自行阅读,但是我们下面使用的OpenResty十分简单,不需要看下面的课程也能看懂。
java进阶教程OpenResty高性能亿万级商品详情页方案_哔哩哔哩_bilibili
4.使用OpenResty建立nginx缓存
首先将项目的缓存修改为OpenResty支持的自己创建的缓存
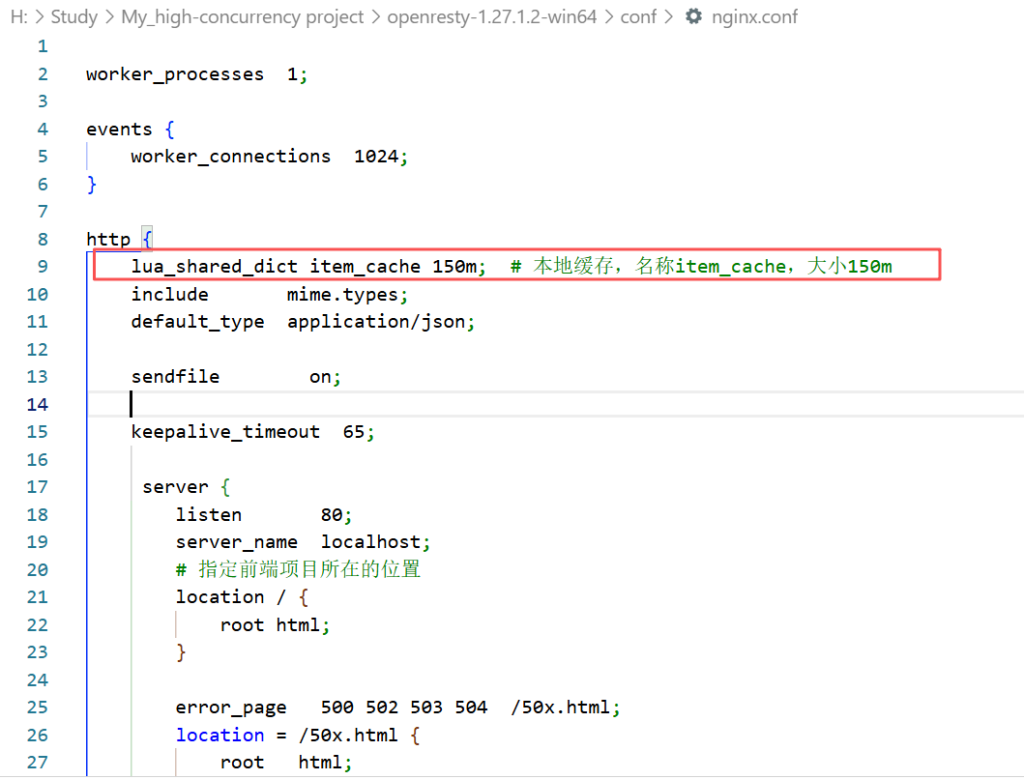
lua_shared_dict item_cache 150m; # 本地缓存,名称item_cache,大小150m然后修改两个接口的部分:
server {
        listen       18080;
        server_name  localhost;
        # 指定前端项目所在的位置
        location / {
            root html/hmall-portal;
        }

        error_page   500 502 503 504  /50x.html;
        location = /50x.html {
            root   html;
        }
        # 缓存单个商品详情
        location ~ ^/api/items/\d+$ {
            # 下面这行代码的意思是将请求转发给lua/item_detail.lua脚本处理
            content_by_lua_file lua/item_detail.lua;
        }

        # 缓存批量查询(可根据实际参数格式调整)
        location ~ ^/api/items(\?.*ids=.*)$ {
            # 下面这行代码的意思是将请求转发给lua/item_batch.lua脚本处理
            content_by_lua_file lua/item_batch.lua;
        }
        location /api {
            rewrite /api/(.*)  /$1 break;
            proxy_pass http://localhost:8080;
        }
    }
然后在
openresty-1.27.1.2-win64/lua目录下创建并编写这两个脚本
item_detail.lua:
local cache = ngx.shared.item_cache

-- 1. 解析商品ID
local id = ngx.var.uri:match("/api/items/(%d+)")
if not id then
    ngx.status = 400
    ngx.say('{"msg":"Invalid item id"}')
    return
end

local cache_key = "item:" .. id

-- 2. 查本地缓存
local val = cache:get(cache_key)
if val then
    ngx.header["Content-Type"] = "application/json"
    ngx.header["X-Cache-Status"] = "HIT"
    ngx.say(val)
    return
end

-- 3. 缓存未命中,请求后端
local http = require "resty.http"
local httpc = http.new()
local res, err = httpc:request_uri("http://localhost:8080/items/" .. id, {
    method = "GET",
    keepalive = false
})

if not res or res.status ~= 200 then
    ngx.status = 502
    ngx.say('{"msg":"backend error"}')
    return
end

-- 4. 写入本地缓存,设置10分钟过期
cache:set(cache_key, res.body, 600)

ngx.header["Content-Type"] = "application/json"
ngx.header["X-Cache-Status"] = "MISS"
ngx.say(res.body)
item_batch.lua:
local cache = ngx.shared.item_cache
local cjson = require "cjson.safe"

-- 1. 获取ids参数
local args = ngx.req.get_uri_args()
local ids_param = args.ids
if not ids_param then
    ngx.status = 400
    ngx.say('{"msg":"Missing ids parameter"}')
    return
end

-- 只支持ids=1,2,3 这种格式
local ids = {}
for id in string.gmatch(ids_param, "%d+") do
    table.insert(ids, id)
end

local result = {}
local miss_ids = {}

-- 2. 先查本地缓存
for _, id in ipairs(ids) do
    local cache_key = "item:" .. id
    local val = cache:get(cache_key)
    if val then
        -- 这里假设val是json字符串,解包后插入
        local obj = cjson.decode(val)
        if obj then
            table.insert(result, obj)
        end
    else
        table.insert(miss_ids, id)
    end
end

-- 3. 对未命中的id去后端查
if #miss_ids > 0 then
    local http = require "resty.http"
    local httpc = http.new()
    local miss_ids_str = table.concat(miss_ids, ",")
    local res, err = httpc:request_uri("http://localhost:8080/items?ids=" .. miss_ids_str, {
        method = "GET",
        keepalive = false
    })
    if res and res.status == 200 then
        local items = cjson.decode(res.body)
        if type(items) == "table" then
            for _, item in ipairs(items) do
                -- 缓存每个item
                cache:set("item:" .. tostring(item.id), cjson.encode(item), 600)
                table.insert(result, item)
            end
        end
    end
end

ngx.header["Content-Type"] = "application/json"
ngx.say(cjson.encode(result))
这样我们的这两个接口的nginx缓存逻辑就变成了先查询nginx本地缓存是否有对应id的商品,如果有就返回,如果没有,就只去下一层查询没有的部分,然后更新缓存,并把原来缓存就有的和新查询到的没有的两部分组合成前端需要的,最后一起返回。