02拆分项目并使用nacos注册、OpenFeign实现项目间访问
首先拆分项目,其实这一步很简单,只需要把不同模块的功能分到不同的Model中。本项目总共有5个部分构成,商品模块、购物车模块、用户模块、交易模块、支付模块。
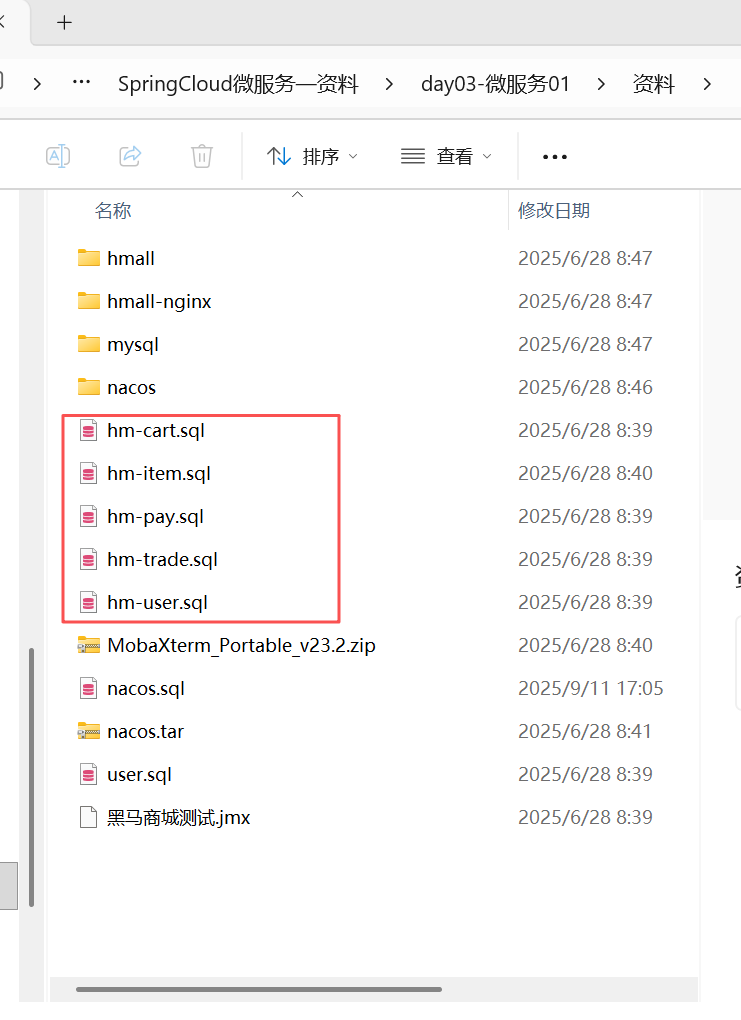
1.导入数据库
模块拆分首先是数据库的拆分,资料中的5个数据库都导入mysql表中。
2.拆分item-service模块
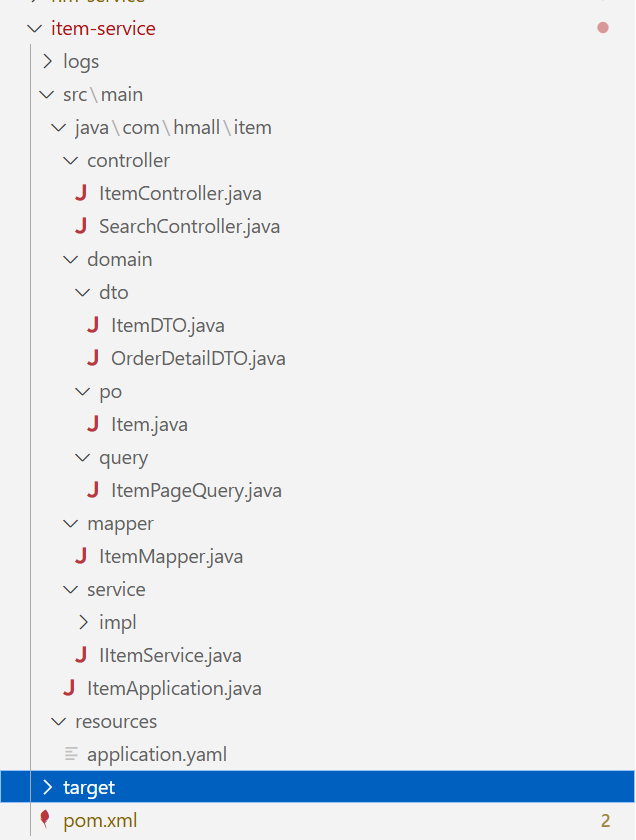
首先拆分商品模块,这个部分最简单,首先把hm-service文件夹里和商品相关的部分全部复制粘贴到item-service模块中,如图所示:
然后修改pom.xml文件和application.yaml文件
pom.xml:(其实核心就是把原来hm-service中的和商品服务相关的依赖引入,然后注意把这个模块的<artifactId>item-service</artifactId>其中的名称改成本模块名称)
<?xml version="1.0" encoding="UTF-8"?>
<project xmlns="http://maven.apache.org/POM/4.0.0"
         xmlns:xsi="http://www.w3.org/2001/XMLSchema-instance"
         xsi:schemaLocation="http://maven.apache.org/POM/4.0.0 http://maven.apache.org/xsd/maven-4.0.0.xsd">
    <parent>
        <artifactId>hmall</artifactId>
        <groupId>com.heima</groupId>
        <version>1.0.0</version>
    </parent>
    <modelVersion>4.0.0</modelVersion>
    <artifactId>item-service</artifactId>
    <properties>
        <maven.compiler.source>11</maven.compiler.source>
        <maven.compiler.target>11</maven.compiler.target>
    </properties>
    <dependencies>
          <!--引入自己的hm-common-->
        <dependency>
            <groupId>com.heima</groupId>
            <artifactId>hm-common</artifactId>
            <version>1.0.0</version>
        </dependency>
        <!--Spring Boot Web 启动器-->
        <dependency>
            <groupId>org.springframework.boot</groupId>
            <artifactId>spring-boot-starter-web</artifactId>
        </dependency>
        <!--数据库-->
        <dependency>
            <groupId>mysql</groupId>
            <artifactId>mysql-connector-java</artifactId>
        </dependency>
        <!--mybatis-->
        <dependency>
            <groupId>com.baomidou</groupId>
            <artifactId>mybatis-plus-boot-starter</artifactId>
        </dependency>
        <!-- nacos配置中心客户端 -->
        <!--nacos 服务注册发现-->
        <dependency>
            <groupId>com.alibaba.cloud</groupId>
            <artifactId>spring-cloud-starter-alibaba-nacos-discovery</artifactId>
        </dependency>
    </dependencies>

    <!-- 用于快速打包Spring Boot应用程序 -->
    <build>
      <finalName>${project.artifactId}</finalName>
      <plugins>
          <plugin>
              <groupId>org.springframework.boot</groupId>
              <artifactId>spring-boot-maven-plugin</artifactId>
          </plugin>
      </plugins>
    </build>
</project>
application.yaml:(这个修改一下端口、application的name、knife4j的api-rule-resources改成自己的controller的位置)
server:
  port: 8081
spring:
  application:
    name: item-service
    cloud:
      nacos:
        discovery:
          server-addr: 127.0.0.1:8848
  profiles:
    active: dev
  datasource:
    url: jdbc:mysql://39.107.193.66:3308/hm-item?useUnicode=true&characterEncoding=UTF-8&autoReconnect=true&serverTimezone=Asia/Shanghai
    driver-class-name: com.mysql.cj.jdbc.Driver
    username: root
    password: rootroot
mybatis-plus:
  configuration:
    default-enum-type-handler: com.baomidou.mybatisplus.core.handlers.MybatisEnumTypeHandler
  global-config:
    db-config:
      update-strategy: not_null
      id-type: auto
logging:
  level:
    com.hmall: debug
  pattern:
    dateformat: HH:mm:ss:SSS
  file:
    path: "logs/${spring.application.name}"
knife4j:
  enable: true
  openapi:
    title: 黑马商城接口文档
    description: "黑马商城接口文档"
    email: zhanghuyi@itcast.cn
    concat: 虎哥
    url: https://www.itcast.cn
    version: v1.0.0
    group:
      default:
        group-name: default
        api-rule: package
        api-rule-resources:
          - com.hmall.item.controller
hm:
  jwt:
    location: classpath:hmall.jks
    alias: hmall
    password: hmall123
    tokenTTL: 30m
  auth:
    excludePaths:
      - /search/**
      - /users/login
      - /items/**
      - /hi
然后修改一下每个类中的import和package,改成自己模块的路径(比如把com.hmall.controller改成com.hmall.item.controller),这个可以直接让AI修改,AI可以很快修改好。
3.使用nacos、OpenFeign拆分cart-service模块
3.1仿照item-service进行初步拆分
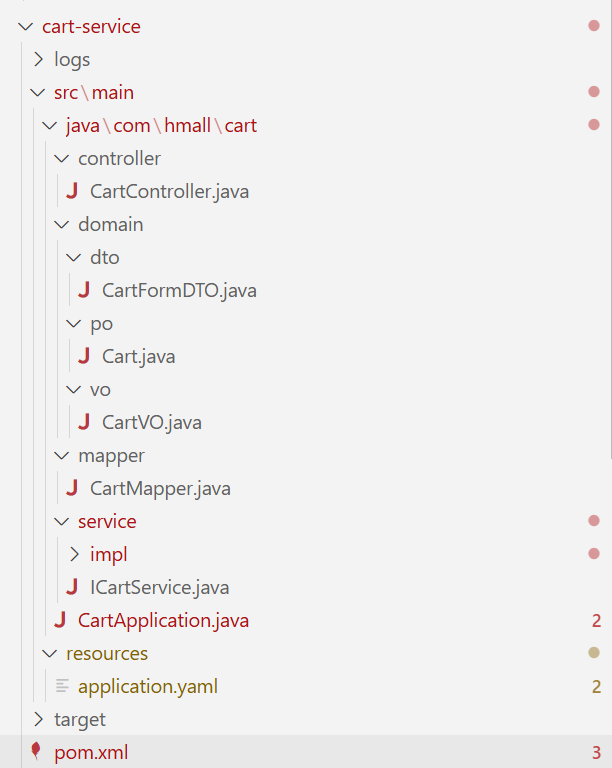
类似item-service,我这里放出对应的项目结构、pom.xml、application.yaml文件(我使用的数据库端口为3308,复制粘贴需要注意修改)
<?xml version="1.0" encoding="UTF-8"?>
<project xmlns="http://maven.apache.org/POM/4.0.0"
         xmlns:xsi="http://www.w3.org/2001/XMLSchema-instance"
         xsi:schemaLocation="http://maven.apache.org/POM/4.0.0 http://maven.apache.org/xsd/maven-4.0.0.xsd">
    <parent>
        <artifactId>hmall</artifactId>
        <groupId>com.heima</groupId>
        <version>1.0.0</version>
    </parent>
    <modelVersion>4.0.0</modelVersion>

    <artifactId>cart-service</artifactId>

    <properties>
        <maven.compiler.source>11</maven.compiler.source>
        <maven.compiler.target>11</maven.compiler.target>
    </properties>

    <dependencies>
        <!--common-->
        <dependency>
            <groupId>com.heima</groupId>
            <artifactId>hm-common</artifactId>
            <version>1.0.0</version>
        </dependency>
        <!--feign模块-->
        <dependency>
            <groupId>com.heima</groupId>
            <artifactId>hm-api</artifactId>
            <version>1.0.0</version>
        </dependency>
        <!--web-->
        <dependency>
            <groupId>org.springframework.boot</groupId>
            <artifactId>spring-boot-starter-web</artifactId>
        </dependency>
        <!--数据库-->
        <dependency>
            <groupId>mysql</groupId>
            <artifactId>mysql-connector-java</artifactId>
        </dependency>
        <!--mybatis-->
        <dependency>
            <groupId>com.baomidou</groupId>
            <artifactId>mybatis-plus-boot-starter</artifactId>
        </dependency>
        <!--单元测试-->
        <dependency>
            <groupId>org.springframework.boot</groupId>
            <artifactId>spring-boot-starter-test</artifactId>
        </dependency>
        <!-- nacos 服务注册发现 -->
        <dependency>
            <groupId>com.alibaba.cloud</groupId>
            <artifactId>spring-cloud-starter-alibaba-nacos-discovery</artifactId>
        </dependency>
        <!--OK http 的依赖 -->
        <dependency>
            <groupId>io.github.openfeign</groupId>
            <artifactId>feign-okhttp</artifactId>
        </dependency>
    </dependencies>
    <build>
        <finalName>${project.artifactId}</finalName>
        <plugins>
            <plugin>
                <groupId>org.springframework.boot</groupId>
                <artifactId>spring-boot-maven-plugin</artifactId>
            </plugin>
        </plugins>
    </build>
</project>
server:
port: 8082
spring:
application:
name: cart-service
cloud:
nacos:
discovery:
server-addr: 127.0.0.1:8848
profiles:
active: dev
datasource:
url: jdbc:mysql://39.107.193.66:3308/hm-cart?useUnicode=true&characterEncoding=UTF-8&autoReconnect=true&serverTimezone=Asia/Shanghai
driver-class-name: com.mysql.cj.jdbc.Driver
username: root
password: rootroot
mybatis-plus:
configuration:
default-enum-type-handler: com.baomidou.mybatisplus.core.handlers.MybatisEnumTypeHandler
global-config:
db-config:
update-strategy: not_null
id-type: auto
logging:
level:
com.hmall: debug
pattern:
dateformat: HH:mm:ss:SSS
file:
path: "logs/${spring.application.name}"
knife4j:
enable: true
openapi:
title: 黑马商城接口文档
description: "黑马商城接口文档"
email: zhanghuyi@itcast.cn
concat: 虎哥
url: https://www.itcast.cn
version: v1.0.0
group:
default:
group-name: default
api-rule: package
api-rule-resources:
- com.hmall.cart.controller
feign:
okhttp:
enabled: true # 开启OKHttp功能
hm:
jwt:
location: classpath:hmall.jks
alias: hmall
password: hmall123
tokenTTL: 30m
auth:
excludePaths:
- /search/**
- /users/login
- /items/**
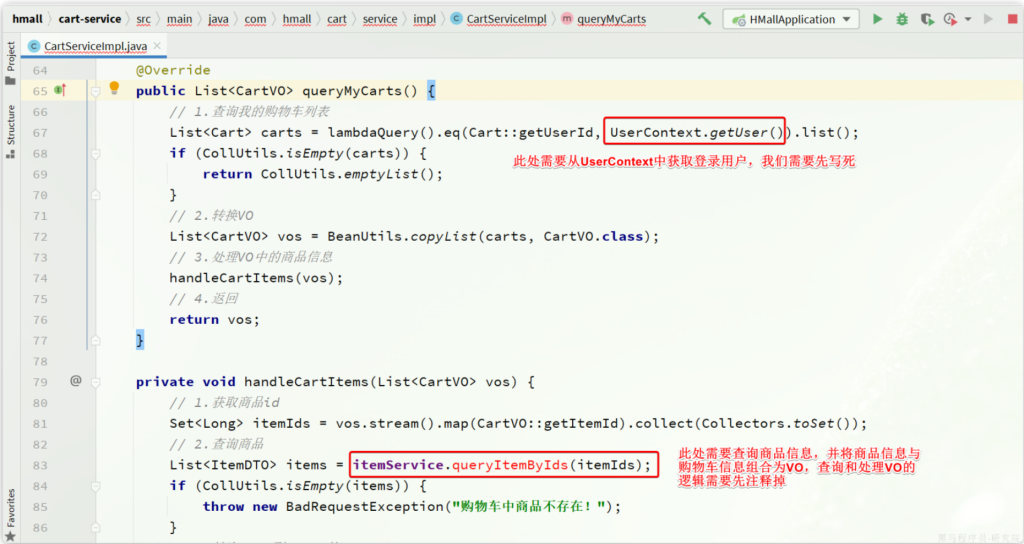
- /hi这个UserContext.getUser()写死成1,但是这个cart-service有个问题:这个itemService.queryItemByIds使用了itemService这个bean对象,原来我们在单体项目里,item-service和cart-service没拆分,可以使用,现在拆分了,不能使用了,该如何做?
这里需要在cart-service中远程调用item-service。一个常见方法就是使用nacos和OpenFeign。
什么是nacos?nacos是一个注册中心,简单来说就是我们首先把需要被远程调用的服务在nacos注册,然后我们就可以调用在nacos中注册的服务。
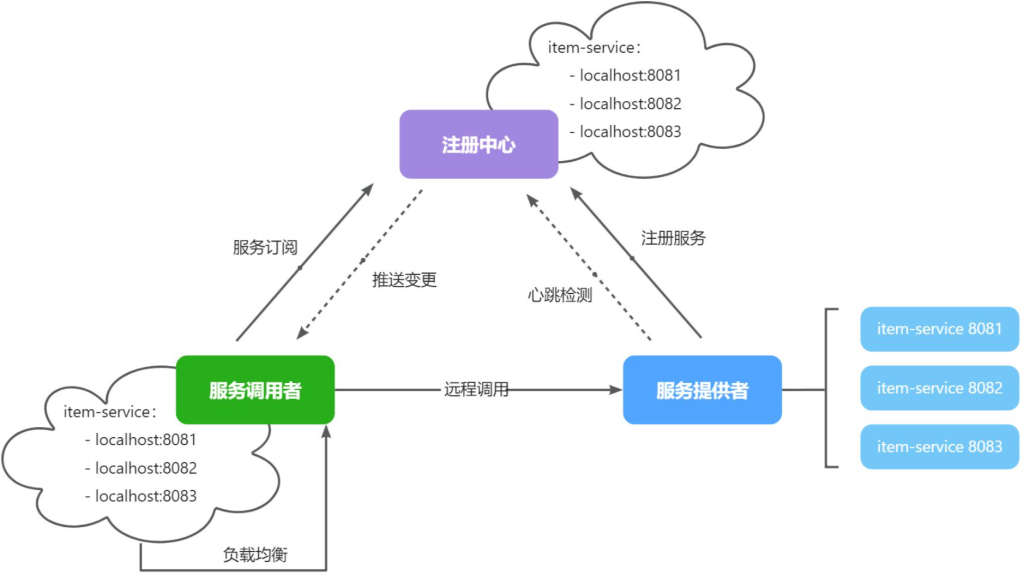
什么是OpenFeign?OpenFeign是一个简化调用逻辑的工具,在没有OpenFeign的时候,我们需要通过RestTemplate来发送调用请求(如下图,十分麻烦)
// 2.1.利用RestTemplate发起http请求,得到http的响应
    ResponseEntity<List<ItemDTO>> response = restTemplate.exchange(
            "http://localhost:8081/items?ids={ids}",
            HttpMethod.GET,
            null,
            new ParameterizedTypeReference<List<ItemDTO>>() {
            },
            Map.of("ids", CollUtil.join(itemIds, ","))
    );
    // 2.2.解析响应
    if(!response.getStatusCode().is2xxSuccessful()){
        // 查询失败,直接结束
        return;
    }
    List<ItemDTO> items = response.getBody();
    if (CollUtils.isEmpty(items)) {
        return;
    }
3.2搭建nacos实现服务注册与发现
那就先来搭建一个注册中心,将资料中的nacos和nacos.tar拖拽到root文件夹下
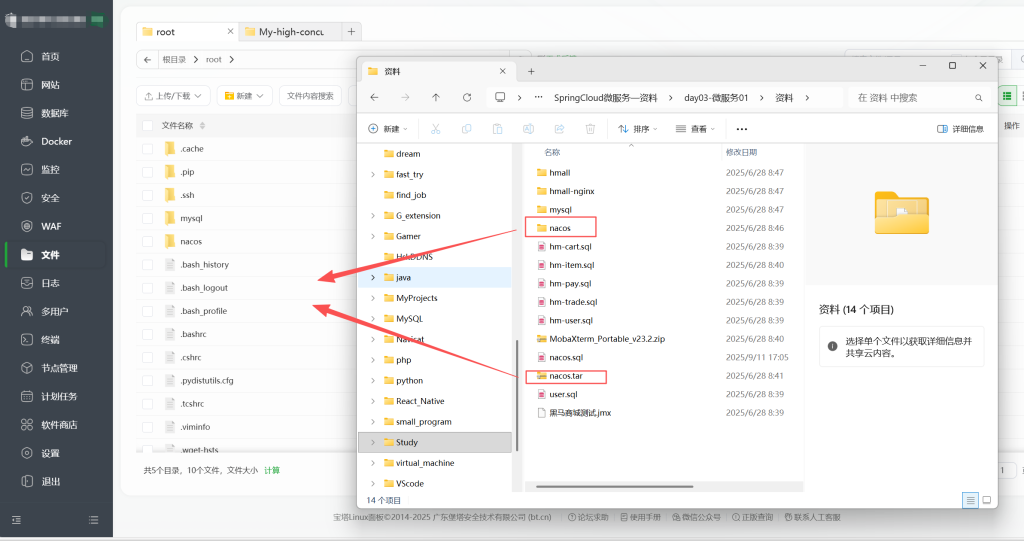
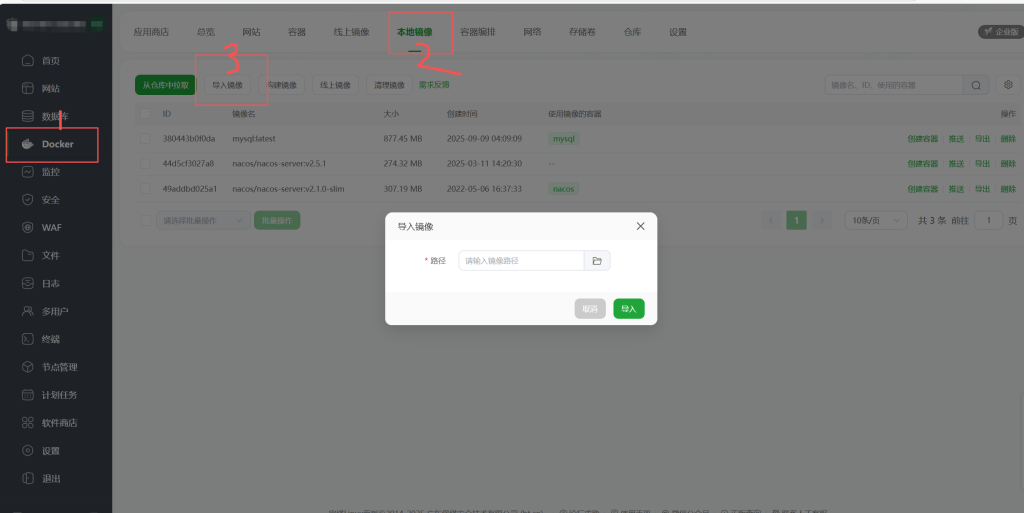
在Docker本地镜像中将nacos.tar导入为本地镜像(注意这里如果nacos.tar的路径中有空格或者其他奇怪的字符,这里会无法导入)
然后点击左侧的终端,在终端中运行命令:(其实也可以使用宝塔图形化界面,但是比较麻烦)
docker run -d \
–name nacos \
–env-file ./nacos/custom.env \
-p 8848:8848 \
-p 9848:9848 \
-p 9849:9849 \
–restart=always \
nacos/nacos-server:v2.1.0-slim
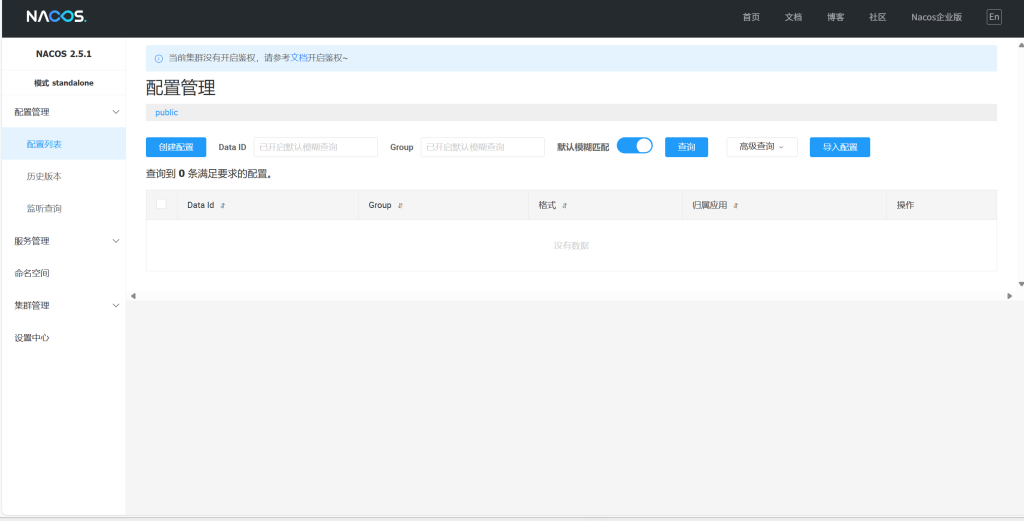
然后输入docker logs -f nacos实时查看nacos的运行情况,当看到最后那几行出现Nacos started successfully in stand alone mode. use external storage,代表成功了,访问http://你的内网ip/8848/nacos可以看到
这里可能因为nacos比较吃内存和CPU性能,可以出现运行后nacos一直无法正常启动、nacos启动后mysql自动关闭等问题,可以直接在windows部署,这里有一篇教程:
Nacos的安装和运行_nacos运行-CSDN博客
重点是下载后把其中conf目录下的application.properties中的配置改成使用mysql数据库,然后配置自己的mysql数据库url、用户、密码等
#*************** Config Module Related Configurations ***************#
### If use MySQL as datasource:
### Deprecated configuration property, it is recommended to use `spring.sql.init.platform` replaced.
 spring.datasource.platform=mysql
# spring.sql.init.platform=mysql

### Count of DB:
 db.num=1

### Connect URL of DB:
 db.url.0=jdbc:mysql://39.107.193.66:3308/nacos?characterEncoding=utf8&connectTimeout=1000&socketTimeout=3000&autoReconnect=true&useUnicode=true&useSSL=false&serverTimezone=Asia/Shanghai
 db.user.0=root
 db.password.0=rootroot

### Connection pool configuration: hikariCP
db.pool.config.connectionTimeout=30000
db.pool.config.validationTimeout=10000
db.pool.config.maximumPoolSize=20
db.pool.config.minimumIdle=2
使用nacos分为两步:服务注册、服务发现。
1.服务注册需要在pom.xml中添加依赖:
<!--nacos 服务注册发现-->
<dependency>
    <groupId>com.alibaba.cloud</groupId>
    <artifactId>spring-cloud-starter-alibaba-nacos-discovery</artifactId>
</dependency>application.yml中添加nacos地址配置:
spring:
  application:
    name: item-service # 服务名称
  cloud:
    nacos:
      server-addr: 192.168.150.101:8848 # nacos地址
然后启动项目可以看到(图中未两个实例是因为我把一个服务使用两个端口开启了两个实例)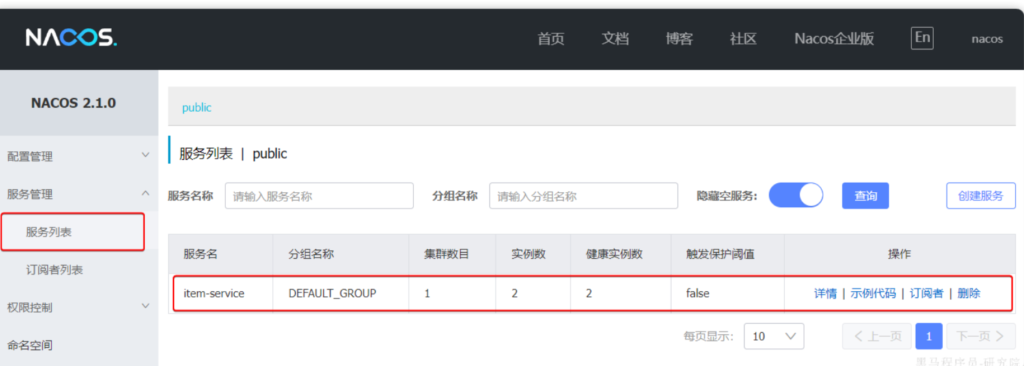
2.服务发现需要在pom.xml中添加下面的依赖:
<!--nacos 服务注册发现-->
<dependency>
    <groupId>com.alibaba.cloud</groupId>
    <artifactId>spring-cloud-starter-alibaba-nacos-discovery</artifactId>
</dependency>application.yml中添加nacos地址配置:
spring:
  cloud:
    nacos:
      server-addr: 192.168.150.101:8848
服务发现需要用到一个工具,DiscoveryClient,SpringCloud已经帮我们自动装配,我们可以直接注入使用
private final DiscoveryClient discoveryClient
3.3使用OpenFeign发送请求
这样就可以在cart-service发送请求到item-service了,但是如何发送呢?这就需要OpenFeign了。
pom.xml中引入OpenFeign的依赖和loadBalancer依赖:
  <!--openFeign-->
  <dependency>
      <groupId>org.springframework.cloud</groupId>
      <artifactId>spring-cloud-starter-openfeign</artifactId>
  </dependency>
  <!--负载均衡器-->
  <dependency>
      <groupId>org.springframework.cloud</groupId>
      <artifactId>spring-cloud-starter-loadbalancer</artifactId>
  </dependency>
然后在启动类上添加OpenFeign的注释:
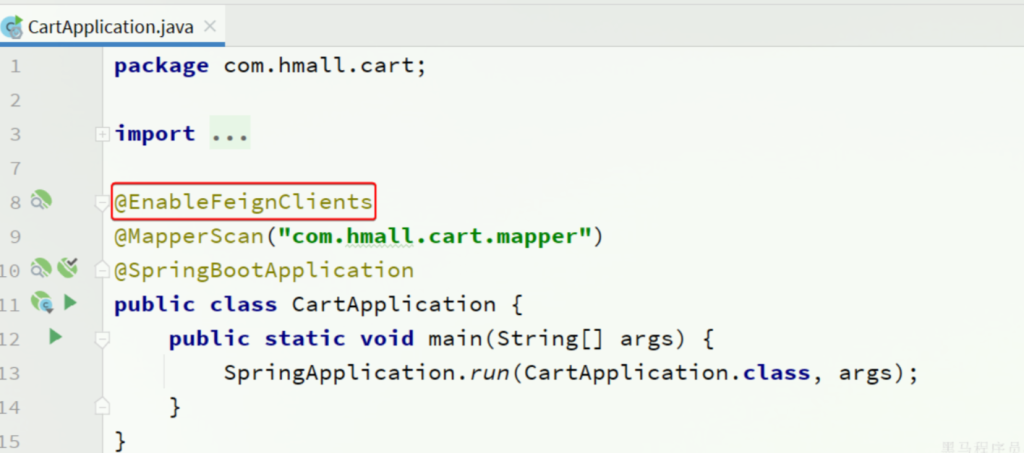
在cart-service中,定义一个新的接口,编写OpenFeign客户端:
package com.hmall.cart.client;

import com.hmall.cart.domain.dto.ItemDTO;
import org.springframework.cloud.openfeign.FeignClient;
import org.springframework.web.bind.annotation.GetMapping;
import org.springframework.web.bind.annotation.RequestParam;

import java.util.List;

@FeignClient("item-service")
public interface ItemClient {

    @GetMapping("/items")
    List<ItemDTO> queryItemByIds(@RequestParam("ids") Collection<Long> ids);
}在cart-service的com.hmall.cart.service.impl.CartServiceImpl中改造代码,直接调用ItemClient的方法:

这里还有个需要优化的部分,就是OpenFeign默认使用的连接是HttpURLConnection,这个不支持连接池,每次请求都会创建新的连接,频繁的连接建立和关闭会带来额外的性能开销。所以可以配置使得其使用的连接是OKHttp ,这个支持连接池,效率高:pom.xml中引入依赖
<!--OK http 的依赖 -->
<dependency>
  <groupId>io.github.openfeign</groupId>
  <artifactId>feign-okhttp</artifactId>
</dependency>application.yml配置文件中开启Feign的连接池功能:
feign:
  okhttp:
    enabled: true # 开启OKHttp功能
4.OpenFeign客户端优化
回忆一下如何在cart-service创建的对item-service的请求,cart-service中创建了一个针对item-service的OpenFeign接口,然后调用这个接口创建并发送请求到了nacos,然后nacos通知注册了nacos的item-service,item-service返回内容。
其中针对item-service需要创建一个OpenFeign接口,以后如果cart-service如果需要对别的模块发送请求,还需要建立别的OpenFeign接口。如果每个模块都需要像cart-service这样建立很多接口的话,会很臃肿,所以可以使用两种思路来解决问题:
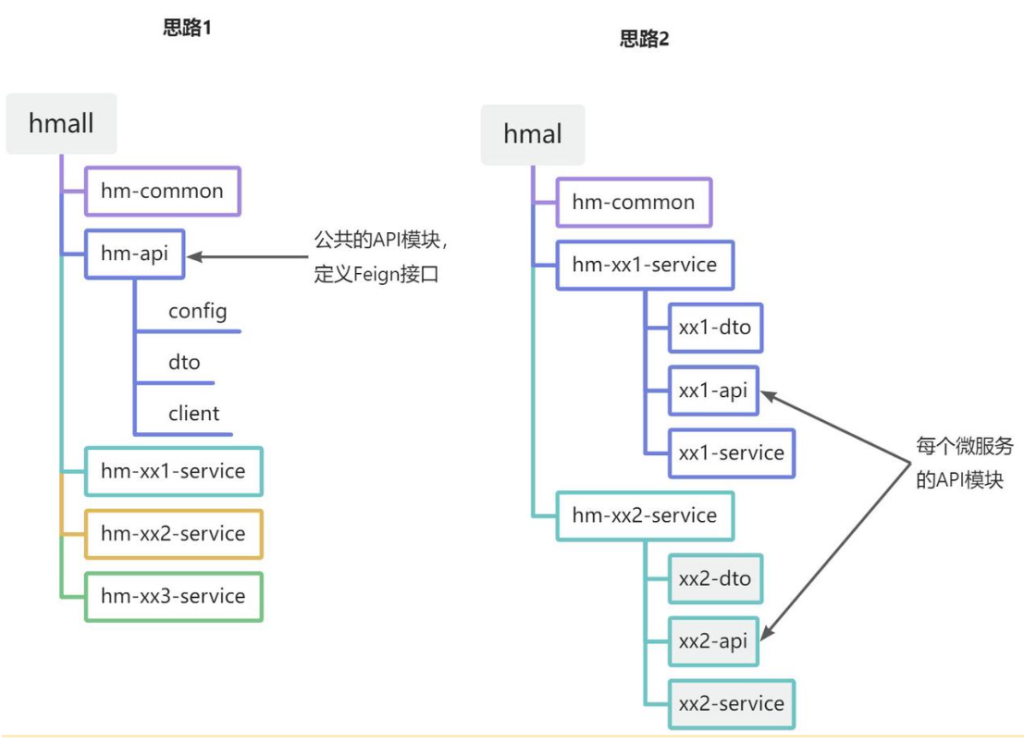
思路2很复杂,但是服务之间耦合度低,思路1相对简单,但是耦合度高,这里我们采用更简单的思路1
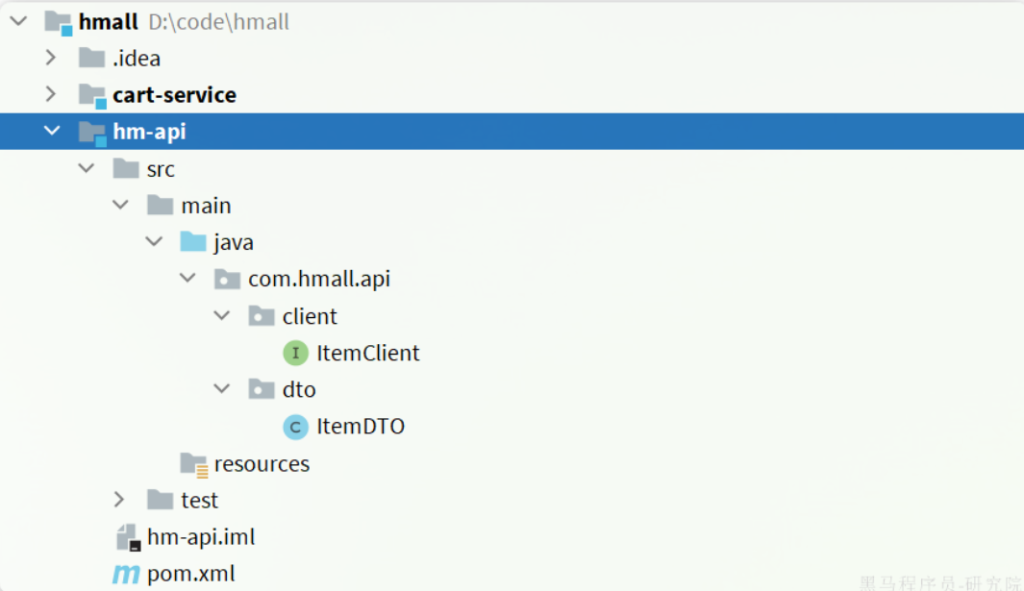
就像创建cart-service和item-service一样,我们创建一个新的hm-api模块,然后将ItemClient和ItemDTO移动到hm-api模块
pom.xml文件:
<?xml version="1.0" encoding="UTF-8"?>
<project xmlns="http://maven.apache.org/POM/4.0.0"
         xmlns:xsi="http://www.w3.org/2001/XMLSchema-instance"
         xsi:schemaLocation="http://maven.apache.org/POM/4.0.0 http://maven.apache.org/xsd/maven-4.0.0.xsd">
    <parent>
        <artifactId>hmall</artifactId>
        <groupId>com.heima</groupId>
        <version>1.0.0</version>
    </parent>
    <modelVersion>4.0.0</modelVersion>

    <artifactId>hm-api</artifactId>

    <properties>
        <maven.compiler.source>11</maven.compiler.source>
        <maven.compiler.target>11</maven.compiler.target>
    </properties>

    <dependencies>
        <!--open feign-->
        <dependency>
            <groupId>org.springframework.cloud</groupId>
            <artifactId>spring-cloud-starter-openfeign</artifactId>
        </dependency>
        <!-- load balancer-->
        <dependency>
            <groupId>org.springframework.cloud</groupId>
            <artifactId>spring-cloud-starter-loadbalancer</artifactId>
        </dependency>
        <!-- swagger 注解依赖 -->
        <dependency>
            <groupId>io.swagger</groupId>
            <artifactId>swagger-annotations</artifactId>
            <version>1.6.6</version>
            <scope>compile</scope>
        </dependency>
    </dependencies>
</project>
然后再在cart-service中引入hm-api模块作为依赖,然后删除掉cart-service中的OpenFeign接口
  <!--feign模块-->
  <dependency>
      <groupId>com.heima</groupId>
      <artifactId>hm-api</artifactId>
      <version>1.0.0</version>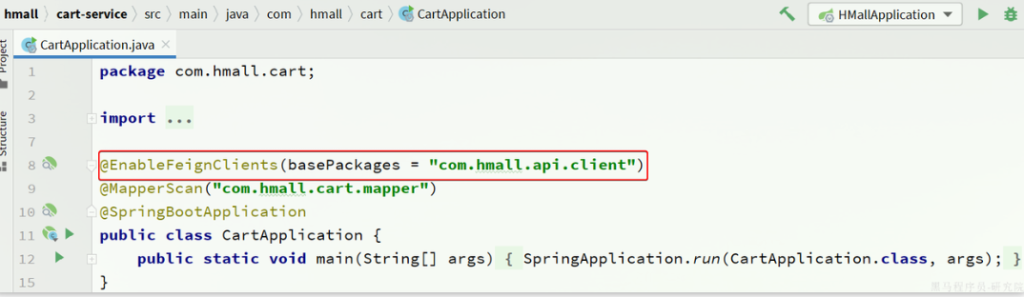
</dependency>但是需要注意ItemClient现在定义到了com.hmall.api.client包下,而cart-service的启动类定义在com.hmall.cart包下,扫描不到ItemClient,所以启动会报错,解决办法很简单,在cart-service的启动类上添加声明即可:
然后就可以启动进行测试了,因为配置了knife4j,访问对应端口可以方便测试后端十分生效http://localhost:8082/doc.html (下图只是一个实例图片,不是这个端口对应的页面)
knife4j:
  enable: false
  openapi:
    title: 黑马商城接口文档
    description: "黑马商城接口文档"
    email: zhanghuyi@itcast.cn
    concat: 虎哥
    url: https://www.itcast.cn
    version: v1.0.0
    group:
      default:
        group-name: default
        api-rule: package
        api-rule-resources:
          - com.hmall.controller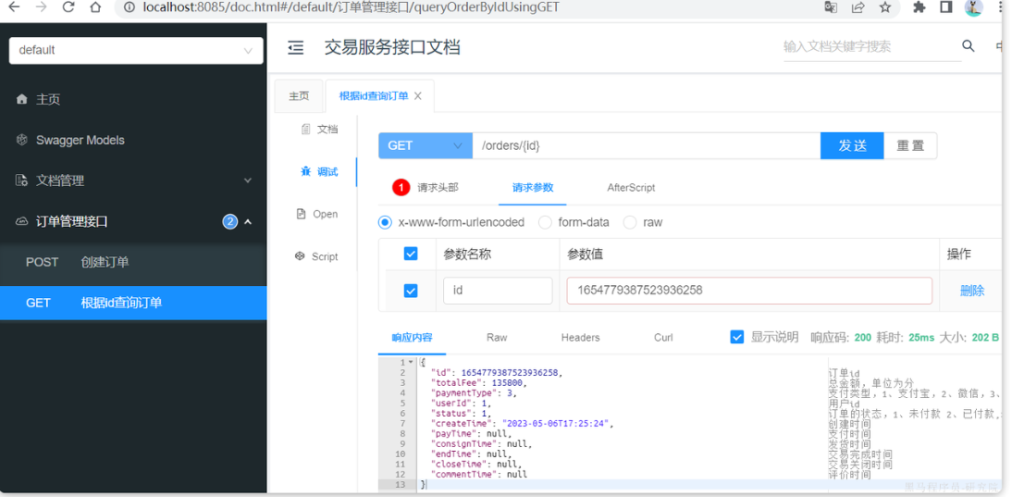
5.拆分user-service、trade-service、pay-service
这部分其实就是重复性工作了,可以仿照着微服务拆分作业参考 – 飞书云文档 这个day03的作业完成,gupengzu/high-concurrency-project at 02five-service这里是已经完成的项目,可以直接拉取,但是记得改每个数据库的ip地址!